Chickweed is a common weed found around the house and garden, usually in moist and shady spots. Although a European native, it has become naturalized in almost every cool and temperate part of the world. In fact, it’s so common that we tend to overlook the possibilities this lowly herb offers.
Chickweed got its common name from being a favorite snack of chickens and other barnyard fowl. It was also a popular green when people used to grow or gather their own food. Considered highly nutritious, it was often given as a restorative to people recovering from debilitating diseases.
Apart from that, chickweed is known to have several healing properties that would prompt you to grow it exclusively for your medicine cabinet if it were not so freely available. Its skin benefits are especially noteworthy, so let’s exploit them by making a healing salve.
To identify Chickweed
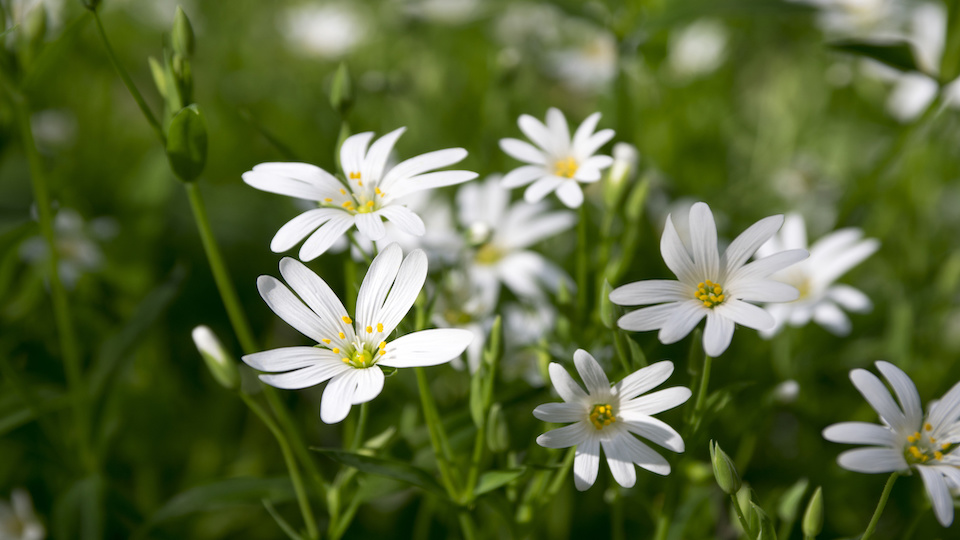
Look for its tiny, star-shaped white flowers, for which it is named Stellaria. Of the many species of Stellaria, what you need is the common chickweed that goes by the botanical name Stellaria media. Each flower seems to have 10 petals arranged in pairs, but on close examination, you will see that they’re actually 5 bilobed petals.
The leaves of chickweed are small, pointed ovals arranged in pairs at every node, and the nodes are far apart. Hold the stem against light, and you will see a single row of hairs along one edge, which switches sides at every node. Try to pull the stem apart, and it will reveal an inner elastic core as it snaps. Most importantly, chickweed doesn’t exude a milky sap.
How to make chickweed salve
Chickweed salve is cooling and soothing, and you can use it for dry, itchy skin, diaper rash, skin abrasions, sores, boils, and acne.
You will need:
- 2 cups chickweed, roughly chopped
- 1 cup olive oil or almond oil
- 1 to 2 oz. beeswax
- 2 vitamin E capsules
- Lavender essential oil
- A double boiler, cheesecloth, glass jug, spoon, small glass containers
Preparation
Partial drying
Chickweed is best used fresh, but its high water content could make the oil go rancid. To prevent this, spread it on a sheet of paper and leave it overnight until it has wilted. This will reduce the volume by half.
Infusing in oil
Bring water to a boil in the bottom vessel of the double boiler and reduce heat. Add the oil to the top vessel of the double boiler and let it get warm. Do not overheat or allow the oil to smoke. Add the wilted chickweed and stir well. Switch off the stove after 5 minutes and let the mixture cool. Keep aside for 6 hours covered with a wire mesh or muslin cloth.
Gently heat the oil mixture in the double boiler after 6 hours, stirring well a few times. Take off the heat after 5 minutes and let it cool as before. Repeat the process after another 6-12 hours. The oil would have become green by now, absorbing all the goodness in the herb.
Filtering out the infused oil
Tie a double layer of muslin cloth over the mouth of the jug. When the oil mixture is still warm, pass it through the muslin to collect the infused oil in the jug. This oil may be used to relieve itching and rashes on the skin. However, it’s easier to use, store, and carry around if it’s in the form of a salve.
Turning the infused oil into a salve
Beeswax is ideal for thickening the chickweed infused oil as it is an organic substance obtained from the beehive. It’s a natural emollient and even offers protection against sunburn.
Beeswax is sometimes available as small pellets or pastilles that are easy to work with, or as big chunks or blocks that should be grated before melting.
Carnauba wax is a vegan alternative to beeswax, but it’s not as easy to obtain. Paraffin wax is a synthetic wax commonly used in commercial products but has no special benefits to offer.
Melt the wax in the double boiler and pour it into the jug containing the warm infused oil, stirring to mix well. As the mixture begins to cool and thicken, stir in the essential oil. Punch the Vitamin E capsules with a needle and squeeze out the contents into the jug, mixing well.
Testing the consistency
Soft salves are easy to apply, but it might need to have thicker consistency if you want to carry it around in a bag or store it in a warm place. You can adjust the consistency by adding either more oil or more beeswax. This is best done before the mixture solidifies. Although it’s possible to liquefy it by gently reheating, it’s not advisable once the vitamin E and essential oils are added.
To test your salve, drop a teaspoonful of the warm mixture on a cool surface, such as a chilled saucer. The consistency after 5 minutes should tell you whether to add more oil or wax.
Bottling
The salve should be poured into storage containers while it’s still warm and fluid. Soft salves are best stored in short glass jars with wide mouths for easy access. Jars of 2 oz. to 4 oz. capacity with screw-on caps are ideal.
Flat metal tins, preferably made of stainless steel, may be used for harder salves and balms. Use tiny ½ oz. metal tins for purse size balm.
-Susan Patterson